Available in Extras Set
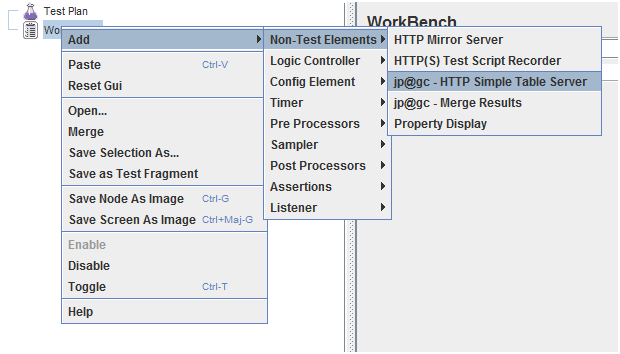
HTTP Simple Table Server since 1.2.0Performance testing with JMeter can be done with several JMeter injectors (on a remote host) and one JMeter controller (with GUI, on your local host). Scripts are sent to JMeter injectors using RMI protocol. Results are brought back periodically to the JMeter controller. Unfortunately the dataset and csv files aren't transferred from the controller to injectors. The main idea is to use a tiny http server in JMeter Plugins to manage the dataset files with simple commands to get / add rows of data in files. ConfigurationIn jmeter.properties file: jmeterPlugin.sts.port=9191 jmeterPlugin.sts.addTimestamp=true jmeterPlugin.sts.datasetDirectory=D:/outils/jmeter/apache-jmeter-2.11/bin/dataset jmeterPlugin.sts.loadAndRunOnStartup=false Do not use '\' in the path directory, it doesn't work well, use '/' or '\' instead. It is also recommended to use UTF-8 as the encoding: sampleresult.default.encoding=UTF-8 If you want automatically start a Simple Table Server on JMeter startup simply add "simple-table-server.bsh" in the "beanshell.init.file" property. Be sure that startup-simple-table-server.bsh file is in your JMETER_HOME/bin directory. The Simple Table Server is a tiny http server which can send http GET/POST requests on port 9191 (by default). You can set a custom port through the graphical user interface or by overriding the jmeterplugin.sts.port property. Distributed architecture for JMeterThe Simple Table Server runs on the JMeter controller (master) and load generators (slaves) make calls to the STS to get or add some data. At the beginning of the test, the first load generator will load data in memory (initial call) and at the end of the test it asks the STS saving values in a file. All the load generators ask data from the same STS which is started on the JMeter controller.
Getting Started
There are different ways to start the STS:
jmeterPlugin.sts.loadAndRunOnStartup=true
jmeterPlugin.sts.port=9191

beanshell.init.file=startup-simple-table-server.bsh
When the STS is running go to http://<HOST>:<PORT>/sts/ to see all available commands. Calls are synchronized, all commands are executed one by one.Example of a dataset file logins.csv: login1;password1 login2;password2 login3;password3 login4;password4 login5;password5 INITFILELoad file in memory. Lines are stored in a linked list, 1 line = 1 elementhttp://hostname:port/sts/INITFILE?FILENAME=logins.csv HTML format:
Linked list after this command: login1;password1 login2;password2 login3;password3 login4;password4 login5;password5 READGet one line from list
http://hostname:port/sts/READ?READ_MODE={FIRST, LAST, RANDOM}&KEEP={TRUE, FALSE}&FILENAME=logins.csv
HTML format:
Available options:
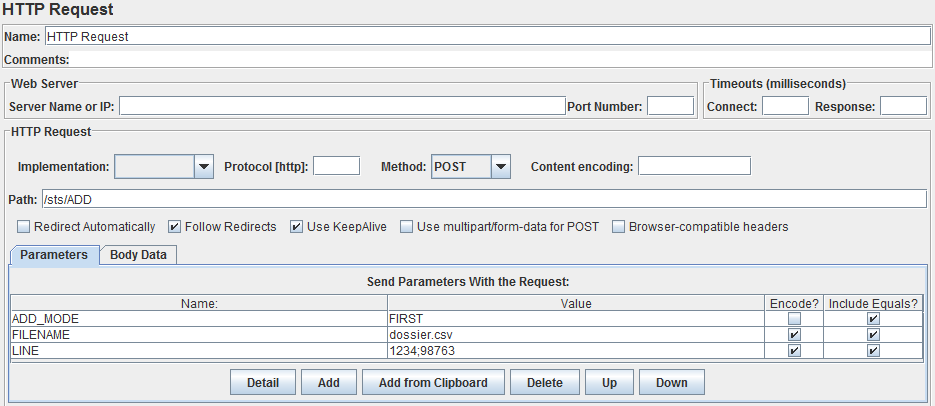
KEEP=TRUE, READ_MODE=FIRST => login1;password1 Linked list after this command: login2;password2 login3;password3 login4;password4 login5;password5 login1;password1 KEEP=TRUE, READ_MODE=LAST => login5;password5 Linked list after this command: login1;password1 login2;password2 login3;password3 login4;password4 login5;password5 KEEP=TRUE, READ_MODE=RANDOM => login2;password2 Linked list after this command: login1;password1 login3;password3 login4;password4 login5;password5 login2;password2 KEEP=FALSE (delete mode), READ_MODE=FIRST => login1;password1 Linked list after this command: login2;password2 login3;password3 login4;password4 login5;password5 KEEP=FALSE, READ_MODE=LAST => login5;password5 Linked list after this command: login1;password1 login2;password2 login3;password3 login4;password4 KEEP=FALSE, READ_MODE=RANDOM => login2;password2 Linked list after this command: login1;password1 login3;password3 login4;password4 login5;password5 ADDAdd a line into a file: (POST HTTP protocol)FILENAME=dossier.csv, LINE=D0001123, ADD_MODE={FIRST, LAST} HTML format:
Available options:
LENGTHReturn the number of remaining lines of a linked listhttp://hostname:port/sts/LENGTH?FILENAME=logins.csv HTML format:
STATUSDisplay the list of loaded files and the number of remaining lines for each linked listhttp://hostname:port/sts/STATUS HTML format:
SAVESave the specified linked list in a file to the specified locationhttp://hostname:port/sts/SAVE?FILENAME=logins.csv If jmeterPlugin.sts.addTimestamp is set to true then a timestamp will be add to the filename, the file is stored in the custom directory specified by editing the jmeterPlugin.sts.datasetDirectory property or in JMETER_HOME/bin directory by default: 20140520T16h33m27s.logins.csv HTML format:
RESETRemove all of the elements from the specified listhttp://hostname:port/sts/RESET?FILENAME=logins.csv HTML format:
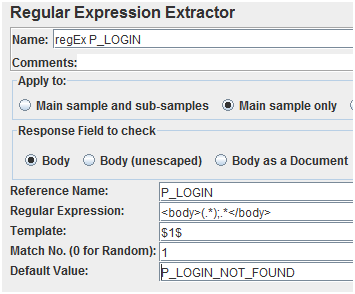
STOPShutdown the Simple Table Serverhttp://hostname:port/sts/STOP See examples below for further information. Using STS in a Test PlanInitialize file using a "setUp Thread Group" by calling URL with one or more HTTP Request Sampler. Reading a row of data is done by calling READ method at each iteration by a HTTP Request Sampler. Then you can use a Regular Expression Extractor to parse the response data. Reading login:
Reading password:
At the end of your Test Plan you can save remaining/adding data with a HTTP Request Sampler in a "tearDown Thread Group". Example
In a loop, read random values from a file containing a login and a password at each row: Read value from a file containing a login and a password at each row, each value is unique and cannot be read anymore: Add rows in a new linked list and save it in a file when the test is done: Read in a random mode a dataset located on the controller machine with severals slaves. The first injector loads the dataset in memory while the other injectors are waiting few seconds. The different injectors read randomly the data containing logins and passwords. When the test is done the first injector save the values in a file with a timestamp as prefix: You can override STS settings using command-line options:
jmeter.bat -DjmeterPlugin.sts.loadAndRunOnStartup=true -DjmeterPlugin.sts.port=9191 -DjmeterPlugin.sts.datasetDirectory=d:\data -n –t testdemo.jmx When it's done see results in the Listener Tree View. |
On this page:
|